This post is about the M5Stack CoreMP135: why I like it, and a tutorial about how to use buildroot to create a linux image for it. A follow-up post describes how I create applications with Rust to run on it.
If you want to build a project based on the CoreMP135 and want help, you can hire me! I'd love a good reason to design a custom board around the STM32MP1 or STM32MP2 family, so especially if you are thinking about doing that let's chat.
About the CoreMP135
I really like this little $75 computer from M5Stack. It's a nicely packaged, low power, small application processor which can run Linux and has a great set of IO with good connectors. It also has a small touch screen for a UI. It's like a less powerful, better packaged Raspberry PI designed for industrial control applications.
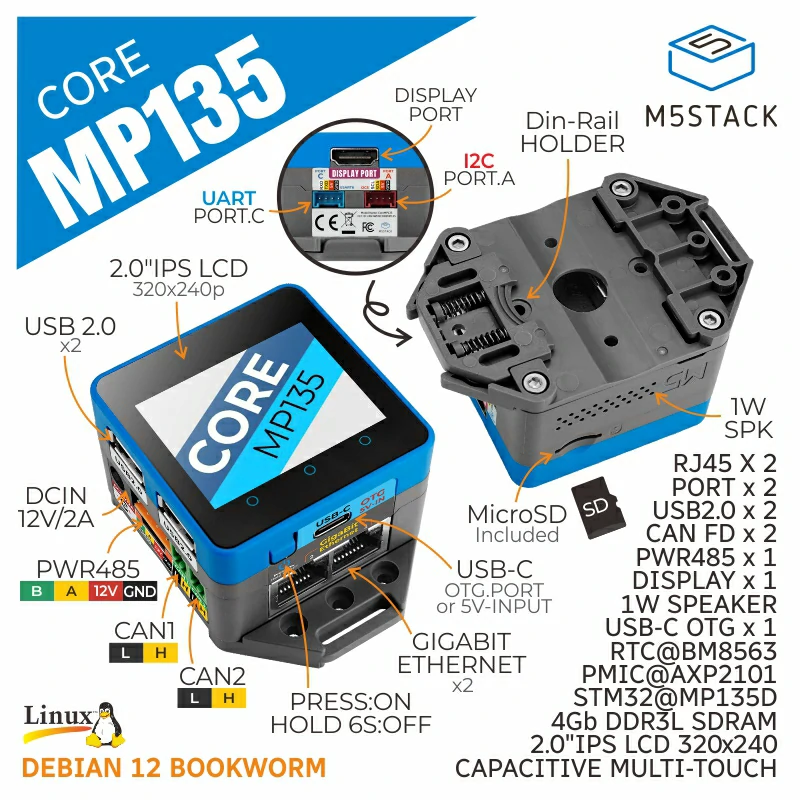
It's based on the STM32MP135. I'm a long-time user of the STM32 line of MCUs, and this family is a great addition to it -- it's an application processor with a peripheral set that feels more like a microcontroller than e.g. the broadcomm chips you find on a raspberry pi. It's single core, and has just 512MB of RAM, so it's a lightweight for computational power, but I don't usually need that and the packaging on this is so much nicer than a raspberry PI with some kluged on extension board to get the IO you need. It also comes with a DIN rail mount as well as tabs with screw holes for mounting in your system.
I first picked it up to replace a raspberry PI I had as a house monitor / control system for a camper. The raspberry PI had the usual problems:
- Power hungry
- I had to have large USB adapters for CAN and RS485, and I don't like those hanging off the USB-A ports in a vibration-heavy environment
- Flaky USB drivers that seem to crash every couple weeks, requiring a reboot.
- Needs a 5V regulator
The M5Stack has:
- 2 CAN controllers
- 1 RS485
- 1 TTL UART
- 1 I2C
- 2 gigabit ethernets!
This was perfect for my application, because it lowered the power consumption, runs off the 12V battery, has a smaller physical footprint, and I could use the integrated RS485 + CAN. The touch screen was a happy bonus.
Some things I wish it had: An on-board eMMC so that I can store the application there while still having the uSD card for removable storage, and the ability to connect a battery backup for the RTC to keep time when 12V power is removed.
I'm happy with it in the camper, and I have already ordered a second and found a use for it on a client project. It's now one of the things that I always want to have a spare on hand for when something comes up.
Programming with Buildroot Linux
The hardware is great, but I felt that the buildroot examples from M5Stack left a lot to be desired. So I built my own buildroot external tree to support the board, and to base my own applications off of for faster development. So I'm going to walk through what I did to get up and running using buildroot, and RAUC for OTA updates.
Buildroot vs Debian
M5Stack does provide a debian image you can load, and start using this like a normal linux machine, SSHing in and installing packages with apt. I threw this right out. I don't want to treat this like a server, I want to treat it like a microcontroller. This means I want a build process to create a complete image, and I want that image to be as small as possible. I also want the system to be stripped down to just what I need, because that's good for stability. I also want to support over-the-air updates, so it's easier to ship new code to the controller.
There are basically two common ways to build an embedded linux image: buildroot and yocto. I don't have a strong argument for one over the other, but I have a lot more experience with buildroot, and that is what M5Stack used for their example, so that is what I used.
Buildroot Basics
The way buildroot works is: you checkout the buildroot repository, you configure it (e.g. you can
start with make menuconfig, but more likely you start with a defconfig from somewhere else, more
on that later), and then you build it. It will go and download tarballs of all the components you
enabled -- this is things like the linux kernel and u-boot, as well as utilities for your file
system like busybox and an ssh server. It's all the packages that make up a functioning linux
system. It puts all these together into an image which you can load onto your flash device through
a wildly convoluted series of makefiles and bash scripts.
Get the buildroot tree
I started with the st/2024.02.9 branch of the bootlin buildroot
fork. This does not appear to have a lot of
changes from the mainline buildroot, and the
changes seem to be related to trusted-firmware-m, which I don't think is relevant to the STM32MP135,
so I think I could have just used the mainline buildroot. But I haven't it, so I'm not 100% sure.
The BR2 External Tree
A typical way to customize a buildroot system is to create a "br2 external tree". This can contain your own configuration, filesystem overlay, device trees, custom packages, etc.
Bootlin maintains an example BR2 external tree for the whole STM32MP1 family here. It's really close, but you can't use this as-is for the CoreMP135 because it is based on dev boards which have different hardware, different pinouts, etc. The changes require, at minimum, some modification to device trees.
M5stack published their own fork of this for the CoreMP135 here. I wish they'd cleaned it up a bit -- e.g. by removing all of the dev board defconfigs, device trees, etc, to focus on the CoreMP135. You can build a filesystem from this, but I felt it was worth the time to dig into it and identify the important changes, prune the noise, and integrate it all into my own "board support package".
I spent a fair amount of time parsing the changes and integrating into my own config, and I think it was worth it because I understand much better what's going on, and now I have support for RAUC, examples of using the touchscreen, and a nice starting point for future projects on the CoreMP135. I spun up a new application last week for a client and it only took 1.5 days of work, because I could focus on building the new touch UI and application logic, and didn't have to think much at all about the underlying system configuration.
I'm using kernel v6.1. This is still fairly old (December 2022), and maybe one day I will take on updating to a more recent kernel. The bootlin external tree is using kernel v6.6 (October 2023), so there's probably no reason I can't use at least that. But there are patches that may be affected, and often there are device tree schema changes between kernel versions, so updating is not necessarily trivial. For now v6.1 is getting the job done and there are other things to do.
Touchscreen issues
There are a collection of patches provided in the M5Stack BR2 external examples for the ILI9342C display, and for the backlight which is controlled by an AXP2101 power management IC. M5Stack provides two board configurations:
coremp135with kernel v6.1coremp135_5_15with kernel v5.15
A major change between these two kernels is the implementation of the Direct Rendering Manager (DRM)
subsystem for displays. On the 5.15, the LCD driver creates a framebuffer at /dev/fb1 and I found
drawing to the display to be as simple as writing pixel data to this framebuffer. However, on the
v6.1 kernel, the LCD is implemented as a TinyDRM device. Luckily, the DRM system does support the
legacy frame buffer interface as well, but I found it did not work! After a log of digging and
learning, I realized that the DRM pipeline was not being enabled, and the way I ended up enabling it
is by installing modetest and running that. To add the modetest executable to the system, you need
the right libdrm packages installed:
BR2_PACKAGE_LIBDRM=y
BR2_PACKAGE_LIBDRM_HAS_ATOMIC=y
BR2_PACKAGE_LIBDRM_INSTALL_TESTS=y
Then, I just added modetest to rc.local so it is run at boot. This was a huge time sink for me, and
one of the reasons I became frustrated with the M5Stack examples -- the examples just do not seem to
work on the coremp135 defconfig from the M5Stack repo. I suspect there is a more straightforward
way to enable the pipeline via libdrm, but I haven't dug into that yet.
The backlight can be controlled easily via sysfs, by writing a number to
/sys/class/backlight/axp2101_m5stack_bl/brightness, e.g.:
echo "100" > /sys/class/backlight/axp2101_m5stack_bl/brightness
RAUC for OTA
Another problem to tackle was setting up RAUC for over-the-air updates. There are a lot of different config options, and a lot of things that have to be setup just right to get everything working.
The way I set it up is that the bundle always includes the entire filesystem, including linux and the application -- an alternative is that you can also set up separate bundles for the filesystem and the application, so that application updates can be smaller when they don't require any changes to the main system. There are two rootfs partitions (A and B), so that if a programming of one fails, it can fall back to booting from the previous version. There is also a third and separate data partition, which can be used to store data that does not get erased during updates.
RAUC requires communication between u-boot and linux, because ultimately it is u-boot which has to
decide which partition to boot from. The communication is done via a shared section of flash which
stores the "u-boot env". In the file stm32mp13_defconfig from the STMicro version of the u-boot tree, you can find the value of
CONFIG_ENV_OFFSET defined as
0x900000,
or you can once you've searched enough! This is there u-boot will look for its environment. There is also a second offset, CONFIG_ENV_OFFSET_REDUND, for a redundant copy of the env. Why is the env stored 9MB into the SD card? I've certainly no idea; I guess someone decided that would allow enough space to store the FSBL images before it.
So, when creating the final image file using genimage, you must make sure to allocate the env partitions at the right flash offsets and then store the uboot env there.
The final partition config in genimage.cfg looks like this:
image sdcard.img {
    hdimage {
        partition-table-type = "gpt"
    }

    partition fsbl1 {
        image = "%ATFBIN%"
    }

    partition fsbl2 {
        image = "%ATFBIN%"
    }

    partition fip {
        image = "fip.bin"
    }

    partition u-boot-env {
        image = "uboot-env.bin"
        # Matches CONFIG_ENV_OFFSET in U-Boot config
        offset = 0x900000
        # Matches CONFIG_ENV_SIZE in U-Boot config
        size = 0x2000
    }

    partition u-boot-env-red {
        image = "uboot-env.bin"
        # Matches CONFIG_ENV_OFFSET_REDUND in U-Boot config
        offset = 0x940000
        # Matches CONFIG_ENV_SIZE in U-Boot config
        size = 0x2000
    }

    partition rootfs-a {
        image = "rootfs.ext4"
        bootable = "yes"
        size = 500M
    }

    partition rootfs-b {
        image = "rootfs.ext4"
        size = 500M
    }

    partition data {
        image = "data.img"
    }
}
So, when creating the image, these partitions are loaded with the environment from the
uboot-env.bin file. But where does this file come from you ask?! Well, it is created by the
uboot-tools package, because in coremp135_defconfig, we specify the right options:
# Need to customize u-boot env for OTA support
BR2_PACKAGE_HOST_UBOOT_TOOLS=y
BR2_PACKAGE_HOST_UBOOT_TOOLS_ENVIMAGE=y
BR2_PACKAGE_HOST_UBOOT_TOOLS_ENVIMAGE_SOURCE="$(BR2_EXTERNAL_COREMP135_PATH)/board/coremp135/uEnv.txt"
BR2_PACKAGE_HOST_UBOOT_TOOLS_ENVIMAGE_SIZE="0x2000"
BR2_PACKAGE_HOST_UBOOT_TOOLS_ENVIMAGE_REDUNDANT=y
What goes in the env? Well, again as usual there are a few ways that one can go about it. What I
ended up using was the countdown method, where u-boot keeps track of two counters: BOOT_A_LEFT and
BOOT_B_LEFT. Each time u-boot boots from one of the partitions, it decrements the counter. If the
counter for A reaches 0, it boots from B instead. When the linux image successfully boots, it sets
the counter for the partition it booted from to 3 -- this is done by running rauc status mark-good
in rc.local at boot.
To access the env from userspace, you use the fw_printenv and fw_setenv commands. These are
configured via /etc/fw_env.config, which must also be setup to match the partitions of the env
partitions, but here we can at least access them by label instead of by offset -- although, do note
that you must enable eudev in order to get the /dev/disk/by-partlabel symlinks created.
/dev/disk/by-partlabel/u-boot-env 0 0x2000
/dev/disk/by-partlabel/u-boot-env-red 0 0x2000
SquashFS must also be enabled for both u-boot and the kernel. RAUC on the target has to be
configured via /etc/rauc/system.conf, and also the RAUC bundle itself has to be built as part of
the post-image.sh hook defined in the BSP external tree, using a key you created (see
generate_rauc_key.sh) to sign it. If this is feeling all a bit convoluted...well, I agree! That's
why I'm trying to make this BSP as re-usable as I can for myself.
If you get all that working, then OTA updates can be performed by simply running a command to grab the image from an HTTP server somewhere:
rauc install https://example.com/bundle.raucb
Checkout the repo
My CoreMP135 BSP is stored on github: https://github.com/mcbridejc/coremp135-bsp
The goal is for this to be a base layer, allowing an application repo to include it as a submodule, and then build on top of it to add application specific stuff. But of course, you can also just fork it and modify it.
To build a filesystem, you can check out buildroot, and checkout coremp135-base, and then use buildroot make, e.g.:
git clone -b st/2024.02.9 https://github.com/bootlin/buildroot
git clone https://github.com/mcbridejc/coremp135-bsp
cd buildroot
make BR2_EXTERNAL=../coremp135-bsp coremp135_defconfig
make -j4
To use RAUC, you need to generate keys (see coremp135-bsp/generate_rauc_keys.sh) and store them
somewhere. Then you can pass their location in using the environment variables RAUC_CERT_PATH and
RAUC_KEY_PATH. You may also want to set RAUC_COMPATIBLE with a unique compatibility string for
your device.
I also recommend copying a public SSH key to buildroot/output/target/root/.ssh/authorized_keys so
you can use it to log in. You can customize the ETH1 static IP address if you like by editing
coremp135-bsp/board/overlay/etc/network/interfaces.
Next steps: Adding a custom application
Next up: Building a Rust Application for the CoreMP135 using Slint